Here we can document the Beta case design evolution. Images, ergonomics, measures, standards, manufacturing process, mockups.
Description
Description
Comment Actions

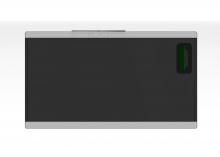
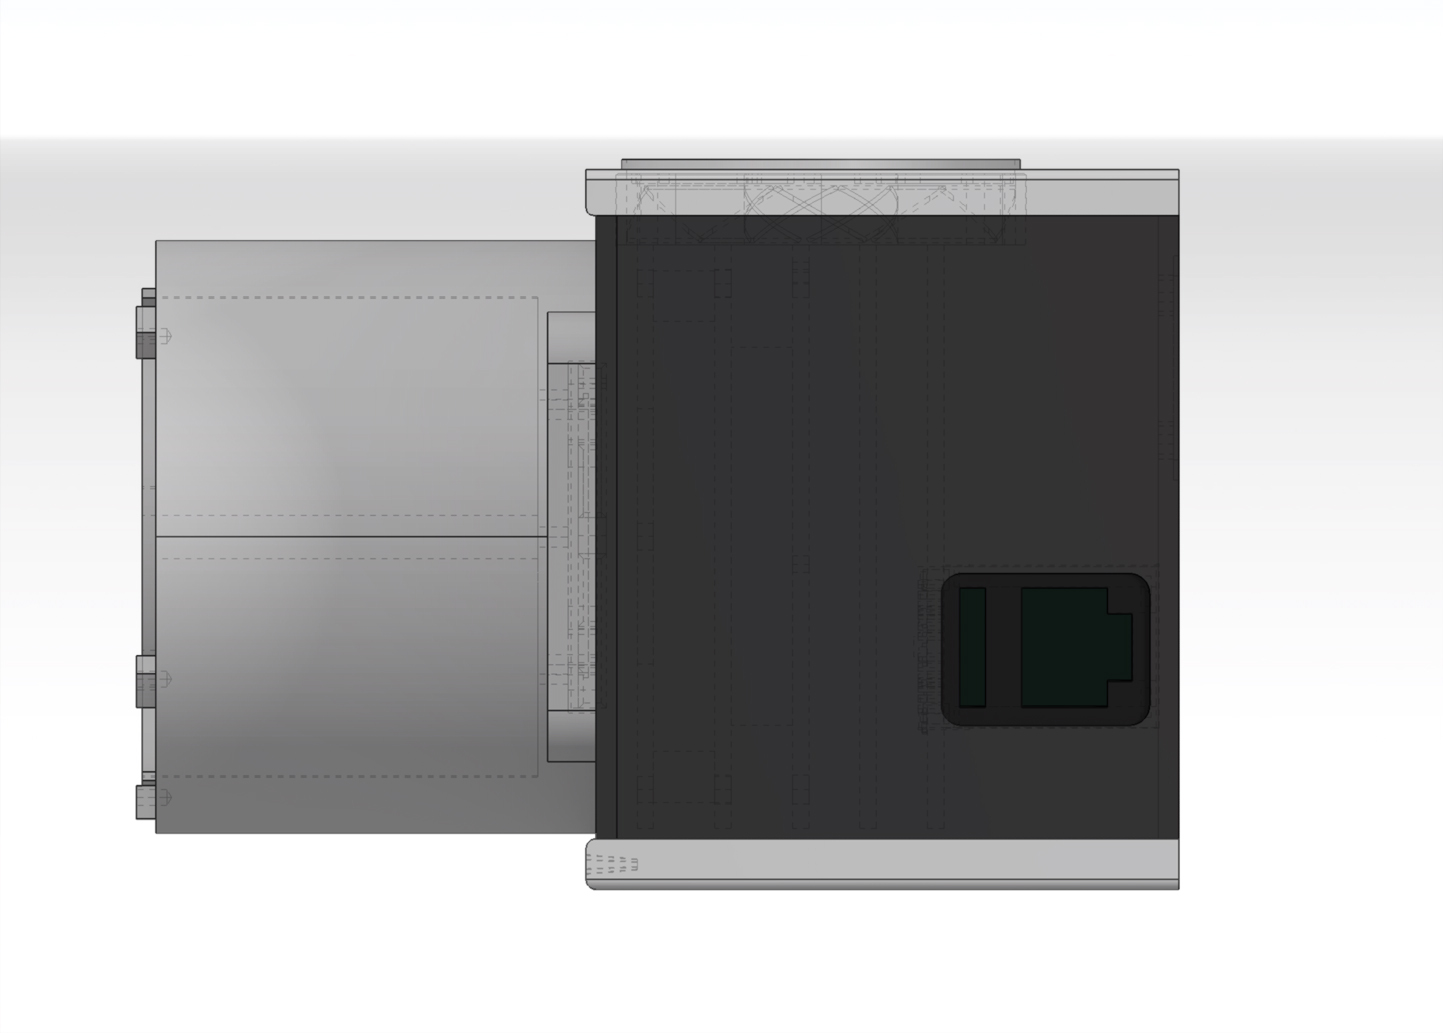
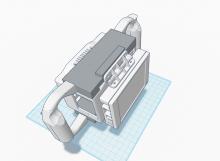
Here is a sketch for the latest PCB stack version including the high speed IO module inside the case (no connectors yet).
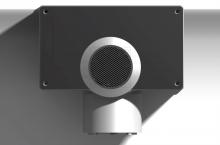
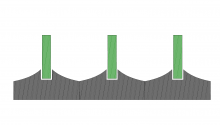
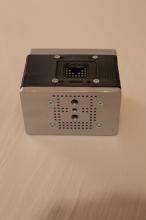
I decided to make the cooling system a feature. When the sensor gets really warm, you should be able to cook a snack on the "grill". Plus its also the apertus logo. "O".
We could imagine stacking two "grills" on each other and being able to rotate the top one, in order to protect the inside when not in used. Or somekind of (automatic?) opening system. Just an idea.
You could open the top plate to get an overview on the PCBs, and open the back aswell, for easier manipulations.
When including the IO module, we gain thickness compared with the first version visible here : https://lab.apertus.org/T95. Maybe a chance for a good ergonomic grip.
the bounding box is a little less than 140 x 80 x 75 h. Each diagonal on the grill is 1mm thick, to get an idea.


as you can see on the top view there is a lot of room around the PCBs. Let me know what you think
This comment was removed by FrancoisGandon.
Comment Actions
I believe it is a pending issue. From what I understand there is a fan on top, and some holes at the bottom, in order to create airflow.
Comment Actions
http://www.centralds.net/cam/?p=6070#!prettyPhoto
interesting reference concerning cooling, and airflow, especially 5.high efficiency heat sink and cooling fan. its for astronomers, reaching for the stars! http://www.centralds.net/cam/?product=cds-5dmarkiiicooled-eos-5d-markiii
"The high efficiency silent cooling fan that supplies the constant air flow to the heat-sink is the 92mm cooling fan from an Austrian company Noctua"
Comment Actions
does the Atomos Ninja Star (95 x 60 x 25mm) fit inside the case? would be interesting to have a recorder on board :)
another idea: what about using the camera upright to make it a better shoulder cam. as an additional second mounting option. the sensor must be read 90 degree counter clock wise and HD only.
Comment Actions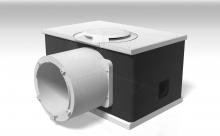


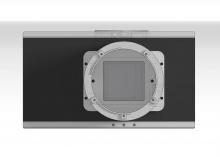
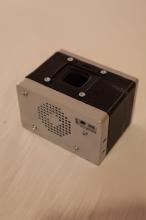
So here is a new version, and a few points :


- I tried to minimize thickness and milling time (minimal fillets) , yet maintain a level of solidity and ergonomy, and respect to the pcb assembly inside. Its not a big deal for me to move the planes around, thickness, width, heights, set backs, everything is controlled by defined parameters. the dxf is on scale. you can check measures. its not an edited drawing though, it might be messy.
- There are 6 alu sheets and a 3D printed part that sits on the ventilation (I tried to make an abstract of the apertus log for fun while protecting the opening, yet maintaining the ventilation possible. but we can make it much simpler, see schematic section). I imagined we could sandwich a thin waterproof yet breathable surface, or a mesh ( in red), in between the top plate and the "cap"). We could also simplify the geometry of the cap and mill it double side. or fold it like in the section. so that we can have some air circulating while protecting the PCBs.

We can screw the fan to the top sheet from the bottom. so that when we disassemble its attached to the top plate. or like in the section above by adding a plate and some screws on the top.
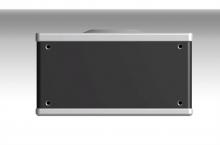
- the sequence for disassembling : we open the top, and then the back. the left and right side could maybe slide, or just be locked in. 12 screws in total (hex?cross? if you have reference, please post). We could add 4 more on the front, and add an extension to the inside aluminium so that we can connect the corners. Just an idea. We can design the slots and ribs that are going to articulate the faces together. But I think its nice to have the bottom and front plate holding the PCB, if one wants to open it hack it (see pic)

- we could think of a system of slots to slide the PCBs or additional 'shields', at regular interval ( see section sketch ). maybe this can be used to do cooling.

- the surfaces on the left and right sides, bottom (and possibly front if we omit the atom ninja star, but i extended the top and bottom plate to protect whatever is there) are planar and therefore I imagine you could mount the camera any direction you please, if i got it correctly (it means you have no obstruction and you can mount additional material, customize etc)
- did I miss any connectors? For now we have ethernet and HighSpeed IO module we can reach.
One thing : i notice the fan isnt exactly aligned with the mount or the sensor.
If this seems strange, I might have missed out on some requirements, since Im very new to this project.
Dont hesitate to tell me what you think or what you would like to see, concerns, suggestions etc. Thank you, and a good NAB to the Apertus team!
Comment Actions
maybe we can think of some kind of ducted turbine on top of the fan to accelerate airflow, like on a plane... just an idea.
Comment Actions
Keep in mind that anything that looks like a turbine or a fan is very noisy... like planes
Comment Actions
I am back! :)
Great to see so much progress here!
Some feedback from NAB: everything that looks like a fan has bad associations (big fan = uh it requires a lot of cooling, small fans = uh the camera seems very noisy) so instead of making the fan a feature maybe we should consider making the fan as invisible as possible (like most other camera manufacturers seem to do currently)...
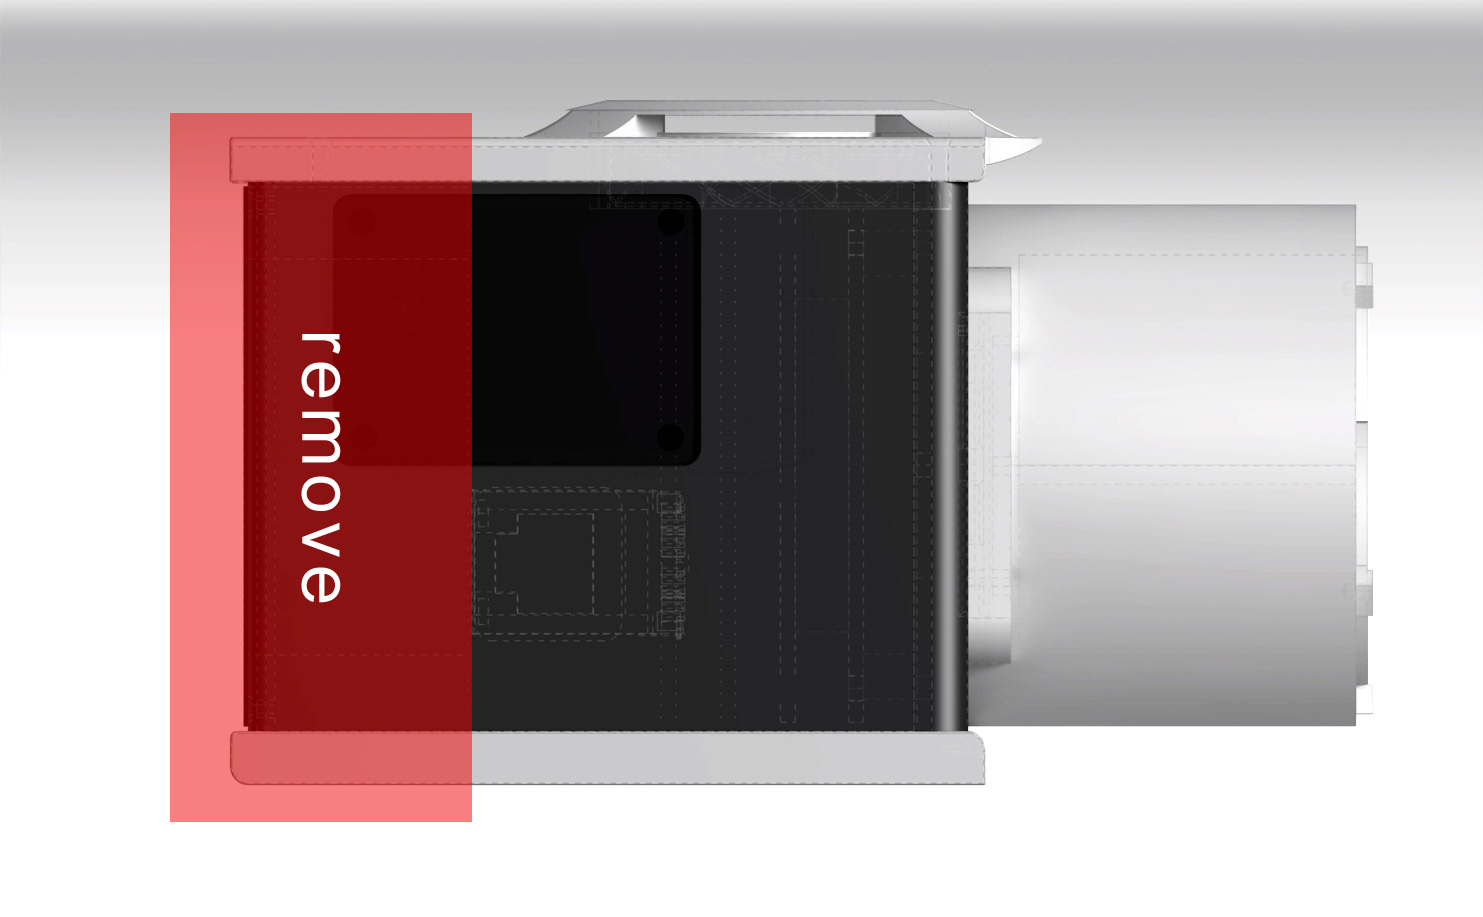
The current design enclosure is a lot longer than it needs to be (the highest electronic element is the height of the top of the HDMI/USB connector block on the microzed.
I would not make the enclosure in any way to fit a particular 3rd party accessory inside it. We should rather consider external mount points so any external accessory can be mounted/connected.
Comment Actions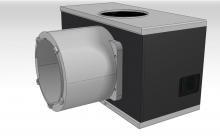


Welcome back Sebastian!
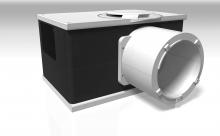
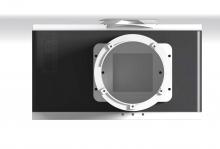
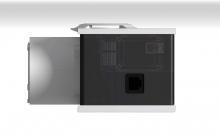
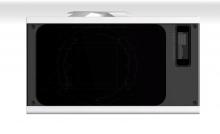
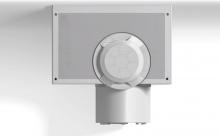
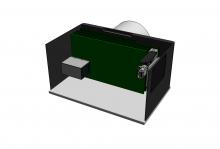
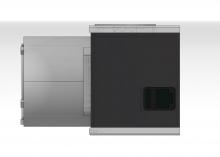
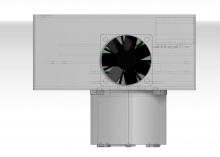
here is a new minimal case in progress with 2mm sheets for the sides and around 4mm for the top and bottom plate.
And no "caps" over the fan yet. the top plate allows to screw the fan from the bottom, if we mill a pocket to place it inside from below.
We could add a thin grid on top to protect the inside from particles.We could hide the fan behind an additional smaller 7th alu surface that works as a cap, protecting from rain for example, or water infiltration with a rib around the aperture (like in the current model) while maintaining air circulation between the inside and outside. We cant make it disappear as it has to be connected to the outside for air to flow (right?), but we can camouflage it or make it look like something else.
The back, left, right and bottom sides are "flushed" on a planar surface, in order to be able to mount additional components easily.


Comment Actions
let's vote for a 'cat on our shoulder'!
(make the beta cam upright, rotate the sensor by 90°)
who else want to use the beta as a shoulder cam?
what counter arguments letting us stay with the still photography form factor?
sebastian told me that it is technically possible and the case is still in progress,
so should we risk a little delay for getting a hot camera according to it's form?
Comment Actions
We got the 90 degree question at NAB, from somebody who was interested in using a lot of the Betas side by side.
Here is what I answered:
Turning the sensor by 90 degree in the current design is not trivial, but adding a special interface board which simply turns all the sensor connections by 90 degree is rather trivial. The additional connectors and PCB shouldn't hurt performance much, but they will add 6.6mm.
Best,
Herbert
Comment Actions
I will set up a poll in the lab to evaluate how many people would be interested in acquiring this additional 90° interface board in the future.
Comment Actions
A caseless version should be nice to have too, because some people (me at least) would want to custom build their own....
Comment Actions
ducted fan actually have better performance for airflow and noise reduction. To get better result concerning noise We could connect the fan to the case through a neoprene surface (which is also weatherproof and breathable).
here is a link for a silent dust immune heat sink fan. the cooling effect is radial though, and not perpendicular to the fan.
Comment Actions
@Bertl: thanks for your answer
@sebastian: thanks for the poll, i think it's the best way to estimate the community needs.
@FrancoisGandon: interesting fan for the gamma i guess
Comment Actions
The fan is rotating with 2000 rpm! I don't want this blade close to my head while filming!
And sadly the design is not open source, they sell licenses....
Comment Actions
Yes, this was just a random piece of information, in case we could improve the fan design to be dust immune.
What about a square neoprene stripe along the current fan edges, below the aluminium case, in order to diminish noise and vibrations? just a suggestion

Comment Actions
I see that the fan is resting on the sensor (probably also on the coming heatsink,around it, and on the pcbs. Could we imagine fixing it from below with a counterbore screw if we find a fan with such holes? the threads could extend to accommodate a cap or a "grill" (or a rosette arri like some people asked for, anything is possible). It can work with a stratification system like in this gamma concept.

I see that the fan is resting on the sensor (probably also on the coming heatsink,around it, and on the pcbs. Could we imagine fixing it from below with a counterbore screw if we find a fan with such holes? the threads could extend to accommodate a cap or a "grill" (or a rosette arri like some people asked for, anything is possible). It can work with a stratification system like in this gamma concept.
Comment Actions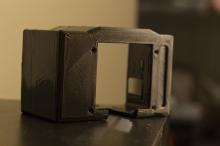
Hi everybody,
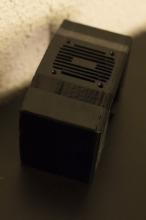
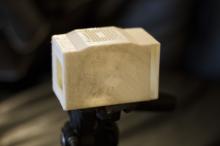
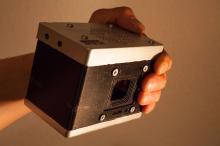
Today we printed the beta enclosure and it's working fine !
Setup for the 3d print:
Material: ABS
Extruder: 235°C
Hot Bed: 85°C
we printed the back first and it's no a good idea !
So print the front face first !
The hot bed was too cold also and the piece start to wrap . I think you can put to 95°C .
We try also to finish the bobdy with acetone vapor and it's also a bad idea because it's destroying the ABS (deformation) . Maybe we did a bad process...
The enclosure was stronger before acetone and with a better look.
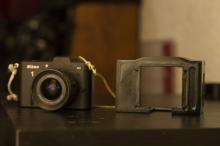
After for me the ergonomic is really great between my nikon v1 and my canon 7D. The perfect compromise.
We will can plug easily the simple body of beta on gimbal, steady or drone in the future.
I just start to modelize rig, handle etc... to see what we can develop or if we need to change something !


Comment Actions
Thanks for the report! This is excellent first hand knowledge!
https://twitter.com/ApertusOSCinema/status/693426610301698048
Comment Actions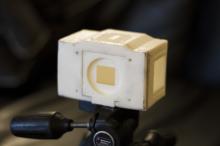
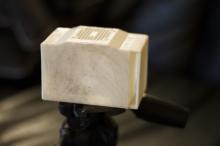


Second step !
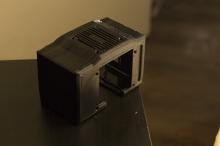
We printed a second Beta and also the full enclosure with e-mount and back enclosure.
Setup for the 3d print:
Material: ABS
Extruder: 265°C
Hot Bed: 90°C
We tried to put lacquer on hot bed to stop wrapping. And it's better than ABS juice but not perfect yet. (on front face you can see wrapping on exterior face, but interior is good)
We printed the front face first with "material support" added before printing.
Unfortunetly we broke the back face, i think we can do a stronger one. On the E-mount we had to cut the piece because the enclosure was not perfect, you can see some little space on the front.


And I start also to modelize à double hand grip , maybe you start also and we can share our ideas ? For me i tried to have a base for plug a display, gimbal, flash, followfocus etc...


Comment Actions
Thanks for printing and the report!
The black filament definitely looks beta :D
How is the general handling for this version? handgrip, etc.?
Comment Actions
Yeah, black filament have a better look for the beta.
I try to have a base to plug any option on the beta. Here you have 2 hand grip like a "cage" but you will can have just 1 handgrip side and plug plate on the otherside like a pliers.
I need a handgrip like this when i'm in mountain on a small rock to be stable but many design to imagine.
You can fix a display on the back, a ledlight on the top, etc...
For the moment it's just a proto, we just finished to built a 30€ opensource 3D scanner and it's working so we can imagine customized handgrip.
(http://www.thingiverse.com/thing:702470)
We will start to built a diy CNC soon so if you have some ideas or design to protoype we will can also help you.
(https://rbotcnc.wordpress.com/)
Next project is also to adapt beta to this open source gimbal.
Comment Actions
It would be an interesting concept for a service to supply users with a piece of clay to squeeze together with their hand.
Then the clay is hardened and returned to the service provider, who 3d scans it and 3d prints a unique hand grip.
I know Aaton did something like that a long time ago and it was really expensive, with much more affordable 3d scanning and printing tech available now this would be possible to produce the same thing much cheaper.
Comment Actions
yeah exactly ! a new start up will start a kickstarter campaign for bicycle handgrip.
http://formygrips.com/pages/about-formy-bike
The same concept can be applied with a cheap 3d scan and 3d printer i think so we will start to work on this thing.
(we print a new 3d scan and he looks better than our first one : http://www.freelss.org/ but not tested yet)
The question is to the community, if we prefer cage with a screws system, or clamp to fix it and if we define now a reference for diameter ,threaded or non-threaded etc... Maybe we have expert on standard industry ?
Some ideas here:
http://alcaudullo.com/6-best-panasonic-cages-for-the-panasonic-gh4/
http://www.ocon.com/inspiration/labs/labs-5-o-grips-range-of-motion/
https://www.youtube.com/watch?v=1RaFZMsyLRY
https://www.youtube.com/watch?v=s9VQGWmfHQM
https://www.youtube.com/watch?v=2rN9x6cnUKQ
Comment Actions
The clay is a great idea. An owner won't want to start slapping clay onto the camera so one good way of creating a foundation for doing that would be to emulate what Wooden Camera does. Once form factor specs are final he creates the camera body with wood. It's a gimick essentially, but because the Beta is relatively box shaped this won't be all that difficult for a user to accomplish, and any differentiating between the outer form factor and the inner clay mould could be fine tuned in-house.
Cheese plate based cages are most popular because of rig flexibility. bebob, a German manufacturer, did very well with their BMCC cages. In terms of grips people can't get enough of wood though. Wood could be milled according to the same clay mould process of course, but its always an expensive option.
Would certainly be a nice accent, and probably worth splashing out on for Gamma promo.

Comment Actions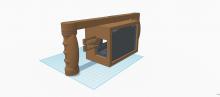
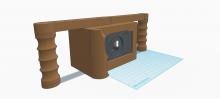
I like the wood look !
I just start to design a "terminator" cage that we can take everywere. I will stay on a basic thing and with a sketchy design but maybe easy to work for a cnc in wood or metal.
I will put many screws like a cheese when i will be happy of the concept. This simple concept is also working for customized handgrip and to adaptable for the open sam gimbal i think.


The idea as i saw somewhere on the wiki or irc, someone want to have a cage directly in the beta body. It's no a bad idea to put some screws on the top, not like a cheese but with some screws options directly on the top or side etc...
Another problems for me is to have a tropicalized system to shoot in the snow or dust. I see a layer from GORE, they are pretty famous for their "gore-tex", a breathable and waterresistant layer for snow jacket.
I just found they did a layer ofr camera.
Someone know if it will be a good solution to put it near electronics and the fan system ?
http://www.gore.com/en_xx/products/venting/portable/cameras.html
Other question to Sebastian or Bertl is what is the weight expected for now for the beta and if you think the camera will be too hot near the fan to have PLA or ABS cage and see your cage start to be a chewing-gum;
I just start to learn 3d modelling with simple sofware and want to learn more about blender but it take time and it a slowly progression ! probably we have a great designer that can do this idea with a better look faster than me ?
Comment Actions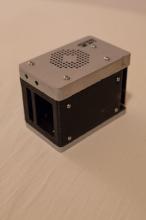
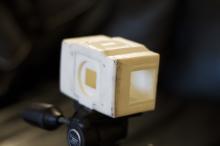
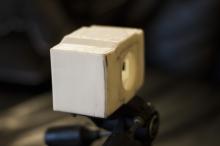
Hi everybody,
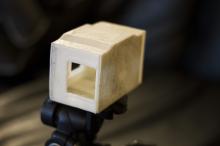
We finish a complete 3d print enclosure.
Material: ABS
Hotbed: 90°
Extruder: 260°
Layer hight : 0.3 mm
lacquer on the hot bed
we found a good way for settings and there is no more wrapping now :D
We are pretty suprised of the result, and it's look like an afordable enclosure to develop


Comment Actions
Would it be possible to add a lenscap as a cover for the fan?
There might be lens-covers that twist to open, but i digress.
It could potentially hole a pancake lens, for when there is no need to run things hot.
Lets say another mount is screwed down atop the camera, then you would have that handy to change it.
Or you could run "other mount" + adapter back to what you have the front of your camera + lens nr2 on top of the camera.
If there is more room for the screws fixing the mount to the camera, one could put thumbscrews there, and actually get at those thumbscrews for easy operation. Ideally it would be the common thumbscrew thread, and then you could just shorten some thumbscrews down maybe.
What i like about the idea is that you could potentially make an aftermarket cooler that just slots down into the camera, and gets affixed with the screw-holes for the top mount.
Also, if there is just that enticing hole, someone will figure out what to do with it.
I didn't see any kensington-lock holes, that is always handy. It sounds like fewer lenscaps lost just saying it.
Also would have liked to see screwholes on the sides, that way you can affix multiple axios together, if you want to make a 360 panoramic shot.
Comment Actions
Would it be possible to add a lenscap as a cover for the fan?
Not sure I follow....
Can you visualize this with a concept image maybe?
Kensington lock is a good idea but might be difficult to manufacture, we will look into it.
Comment Actions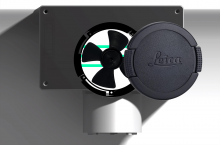

OK, so i shouldnt have used a lenscap to illustrate, and rather a camera cap. That being said, the fan is also the wrong way, but we are seeing the camera from above.
This reuses a part that is already planned for production, and caps are off the shelf. Possibilities are:
Use it for an carrying an extra lens.
And/or
Use it for a convenient way to have another mount readily available.
Comment Actions
I see, not convinced though I must admit...
The fan needs to be running and have free airflow at all times.
Comment Actions
Well not if you use it as a still camera for just a quick image. (?)
Or if you are outside in sufficiently cold weather.
But yes, even if "always" having to remove the lens, is it still not a better solution?
I would like the camera to be as water and dustproof as possible. Having an always open hole into it on the very top doesn't seem as nice.
I see it as better airflow when it is fully open, and more rugged when not. Drawback is another cap to lose.
What I would do is rig a cooler to the outside of the case, and get rid of the fan entirely, this making easier to do, but that is just me.
So what invariably happens is the user forgets to remove the cap, as one does, and the camera runs hot. Can it beep if the cap isn't removed, short of thermal threshold shutting down, which would be bad.
How long can it be operated as an oven in ambient room-temperature?
Comment Actions
The problem is that the Zynq overheats before anything else in the camera even gets warm if there is no airflow or circulation.
Comment Actions
Did you think it possible to add a "weatherproof membrane" at the top of the fan. The idea is to protect a minimum from rain, dust or snow (or coffee) but in the same time keep the camera can breathable.
Some solutions looks good for us but i don't have any experience. ...
http://global-sei.com/products/ptfe/
Comment Actions
Did you think it possible to add a "weatherproof membrane" at the top of the fan.
Yes, using a custom cut PU foam is planned with the full enclosure currently.
Comment Actions
There is still airflow if the fan is on, it circulates internally. Magasinating, or loading, whatever thermal capacity there is there.
If the dissapation air-alu-air is good enough, then maybe.
Adding a headsink on the zynq should give it some headroom too. Maybe coupling it to the chassis with some graphite tape, or some heatpipes.
Stensil cut graphite tape would maybe be a good solution for that.
The most involved of the tops seems to require a lot of machining. (?)
This comment was removed by ZKGoodwin.
This comment was removed by ZKGoodwin.
Comment Actions
We cannot mill magnesium in our CNC as it is highly flammable. So its not just the cost of the material but having production outsourced entirely. Combine that with low volume manufacturing and you will find prices to be totally astronomically I am afraid... :)